
by Vishavjeet | Jan 14, 2023 | blog, Digital Marketing
In SEO, the terms “dofollow” and “nofollow” refer to the instructions that can be included in a hyperlink to indicate to search engines how they should treat the link.
A dofollow link is a link that passes on “link juice” to the linked website, which can help the linked website’s search engine rankings. In other words, when a website includes a dofollow link to another website, it is essentially telling search engines that it endorses the linked website and considers it a valuable resource.
On the other hand, a nofollow link is a link that does not pass on link juice. When a website includes a nofollow link to another website, it is essentially telling search engines that it does not endorse the linked website or consider it a valuable resource.
Dofollow links are the default setting for most links, and they are often used when a website wants to help boost the search engine rankings of the linked website. Nofollow links, on the other hand, are often used when a website wants to link to another website without endorsing it or when the website is linking to a page that it does not want to be associated with. For example: <a href=”https://worldwincoder.com”>WorldWin Coder</a>
What’s your Biggest SEO Challenge Right Now?
Let’s Talk
It is important to note that search engines will still crawl nofollow links, but they will not pass on link juice. This means that nofollow links can still bring traffic to the linked website, but they will not help the linked website’s search engine rankings.
In order to indicate that a link is nofollow, the website owner will need to include a rel=”nofollow” attribute within the HTML code of the link. For example: <a href=”https://worldwincoder.com” rel=”nofollow”>WorldWin Coder</a>
In summary, dofollow and nofollow links are used to indicate to search engines how they should treat a link. Dofollow links pass on link juice and can help boost the linked website’s search engine rankings, while nofollow links do not pass on link juice and do not help boost the linked website’s search engine rankings. Website owners can use these link attributes as per their requirement and SEO strategy.
What’s your Biggest SEO Challenge Right Now?
Let’s Talk
by Vishavjeet | Sep 21, 2022 | blog
To fix this issue, the MySQL extension for PHP needs to be installed and enabled. The specific steps to do this will vary depending on your system, but generally, you can follow these steps:
1. Check if the MySQL extension is already installed by running the command “php -m | grep mysql” in the terminal. If you see “mysql” or “mysqli” in the output, it’s already installed.
2. If the MySQL extension is not installed, install it using the package manager for your system. For example, on Ubuntu, you would run the command “sudo apt-get install php-mysql” in the terminal.
3. Once the extension is installed, you need to enable it in the PHP configuration file. The location of this file will vary based on your system, but it’s typically called “php.ini” and can be found in the “conf.d” or “php” directory.
4. Open the php.ini file in a text editor and search for “extension=mysql”. Uncomment this line by removing the semicolon in front of it.
5. Save the php.ini file and restart the Apache server or PHP-FPM service, depending on your setup.
6. Verify that the MySQL extension is now enabled by running “php -m | grep mysql” again in the terminal. You should see “mysql” or “mysqli” in the output.
Once the MySQL extension is installed and enabled, your PHP scripts that use MySQL should work correctly. As an AI language model, I cannot validate the settings and configurations of your system. However, if the MySQL extension has been installed and enabled properly in your server environment, it should allow PHP scripts to connect to MySQL databases and execute queries without any issues. It is recommended to verify the connection and the correct syntax of your code to ensure it is functioning as intended. It is advisable to authenticate both the linkage and proper syntax of your code to guarantee its desired performance.
by Vishavjeet | Sep 9, 2022 | blog
WordPress LifterLMS is a powerful learning management system (LMS) plugin that allows you to easily create and manage online courses, membership sites, and more on your WordPress website. With LifterLMS, you can easily create and sell online courses, create membership levels, and even create quizzes and assignments for your students.
To get started with LifterLMS, you will first need to install the plugin on your WordPress website. Here are the steps to install LifterLMS:
- Go to the WordPress plugin repository and search for “LifterLMS”.
- Click on the “Install Now” button to install the plugin on your website.
- Once the plugin is installed, click on the “Activate” button to activate it.
- After the plugin is activated, you will see a new menu item in your WordPress dashboard called “LifterLMS”.
- Click on “LifterLMS” to access the plugin’s settings and start creating your courses and membership levels.
Once you have LifterLMS installed, you can start creating your courses and membership levels. To create a new course, go to “Courses” in your WordPress dashboard and click on “Add New”. Here, you can add a title, description, and even a featured image for your course.
What’s your Biggest LifterLMS Challenge Right Now?
Let’s Talk
You can also add lessons and sections to your course by clicking on the “Lessons” and “Sections” tabs. Lessons can include video, audio, text, and even quizzes and assignments.
To create a membership level, go to “Memberships” in your WordPress dashboard and click on “Add New”. Here, you can add a title, description, and even a featured image for your membership level. You can also choose which courses and lessons are included in the membership level, as well as set the price and duration of the membership.
In addition to courses and membership levels, it also includes a variety of other features such as the ability to create certificates, badges, and even an affiliate program. These features can help you to create a more engaging and interactive learning experience for your students.
In order to sell courses or membership levels, you’ll need to integrate a payment gateway like PayPal or Stripe. Lifter LMS integrate with several payment gateways and you can easily configure it from the settings.
In conclusion, LifterLMS is a powerful and versatile plugin that can help you to easily create and manage online courses and membership sites on your WordPress website. With LifterLMS, you can create engaging and interactive learning experiences for your students, and even sell your courses and membership levels directly from your website.
What’s your Biggest LifterLMS Challenge Right Now?
Let’s Talk
by Vishavjeet | Aug 23, 2022 | blog, WordPress
In WordPress, it is possible to redirect users to specific pages after they have logged in, based on certain conditions. This can be useful if you want to direct different types of users to different areas of your website after they have logged in. For example, you may want to redirect administrators to the admin dashboard, while directing other users to the homepage.
To achieve this, we can use the login_redirect filter in WordPress. The login_redirect filter allows you to modify the URL that a user is redirected to after logging in. By default, this filter redirects users to the previous page they were on before logging in or to the homepage if no previous page is set.
Here is an example of how you can use the login_redirect filter to redirect users based on their role:
What’s your Biggest WordPress redirecting Challenge Right Now?
Let’s Talk
function my_login_redirect( $redirect_to, $request, $user ) {
    // Check if the user is an administrator
    if ( is_a( $user, 'WP_User' ) && in_array( 'administrator', $user->roles ) ) {
        // Redirect administrators to the admin dashboard
        return admin_url();
    } else {
        // Redirect other users to the homepage
        return home_url();
    }
}
add_filter( 'login_redirect', 'my_login_redirect', 10, 3 );
This code uses the login_redirect filter to redirect users to different pages based on their role. Administrators are redirected to the admin dashboard, while other users are redirected to the homepage. The function accepts three parameters: $redirect_to, $request, and $user. $redirect_to is the URL that the user will be redirected to, $request is the original request, and $user is the user object of the user that has just logged in.
You can also redirect users based on custom user meta data, for example:
if ( $user->get( 'custom_meta' ) === 'true' ) {
    // Redirect to custom page
    return home_url('custom-page');
}
This code will check if a user has a custom meta data “custom_meta” and if it is set to “true”, then it will redirect the user to a custom page.
It is important to note that the login_redirect filter only affects the redirection of users who have successfully logged in. If a user’s login attempt is unsuccessful, the login_redirect filter will not be applied.
To implement this code, you can add it to your theme’s functions.php file or create a custom plugin for it. This will ensure that the code remains active even if you change your theme in the future.
In conclusion, the login_redirect filter in WordPress is a powerful tool that can be used to redirect users to specific pages based on certain conditions, such as their role or custom meta data. This can be useful for directing different types of users to different areas of your website, helping to enhance the user experience
What’s your Biggest WordPress redirecting Challenge Right Now?
Let’s Talk

by Vishavjeet | Aug 22, 2022 | blog
LifterLMS is a tool to quickly build and deliver online learning on any subject for users anywhere and anytime at any level. Over time, its gadget screens have replaced the whiteboards and blackboards. Today, online learning is a new trend. From setting up the courses to enabling the students to learn them conveniently, learning is very easier today.
Although, when it’s to design the courses for WordPress, LifterLMS is the go-to choice amongst the users. Perhaps, managing the courses is quite challenging. You will require the right tool to manage and modify the courses instantly.
Smart Manager is one tool that lets you supervise all the LifterLMS courses from a single place. Either you need to reduce the enrol course fees for students, edit any course detail or export the courses, you can do it easily. Today, this blog will assist you in better supervising the courses to save the overall cost and time.
Why is LifterLMS the First Choice among the Course Creator?
LifterLMS is the first tool that pops into mind when one thinks about a WordPress Learning Management System. The strong characteristics of the LifterLMS make it a reliable tool among course creators, and these are as follows-
⦁ Design the online quiz and course from a single screening with the help of a drag-and-drop filter.
⦁ Accept enrolment and payments without any limits.
⦁ Sell the memberships without any membership or e-commerce plugin.
⦁ Strong, customizable reporting to rightly understands the learners.
⦁ Keep the learners or students focused with online community, coaching, quizzes, assignments, gamification and more.
⦁ All the security features of LifterLMS stay in complete control of the training assets. It includes launch windows, start dates, prerequisites, drip content, course access rules, personalized student dashboards, and individual user accounts. You can decide who, when and what price can seem them.
Managing Courses, Quizzes and Lessons from a Spreadsheet
As your business develops, you will have many data from the courses to manage. If you need to edit any data, you must search and enter every course for it. Although, modifying thousands of courses can be a tedious task to deal with every time. But with Smart Manager, all the necessary modifications can be done at your fingertips. It also lets you manage all your Lifter LMS courses using an Excel-like spreadsheet. For all the assignments, courses and lessons, all the LifterLMS components can be managed with the Smart Manager. Here is how-
⦁ Add and Manage New Courses Directly
Using Smart Manager’s spreadsheet editor, include various courses directly to the website. Set all parameters like images, price, course difficulty level, course capacity, course length, SKU, and course title. Now you are done.
⦁ Include and manage the lessons and sections for courses
You can include the sections and lessons directly for the courses. You also add text, images, audio, and video files. Set excerpt, featured image, permalink and more using the Gutenberg editor.
⦁ Duplicate courses for bulk generation
Suppose you wish to design courses having the same price, similar content, categories and same duration and use the ‘Duplicate’ option in Smart Manager. After that, you can modify the courses as per your requirement.
⦁ Add and Manage Engagements
Create certificated and engagements, emails and achievements for the engagements. Also, you need to set the engagement triggers and edit them accordingly.
⦁ Add and Manage Assignments, Quizzes, Forms, Transactions
Add as many assignments and quizzes to the courses you want.
⦁ Inline edit courses
You can make the changes to the quizzes, questions, forms, sections, lessons, courses etc. and save them with the help of a spreadsheet.
What’s your Biggest LifterLMS Challenge Right Now?
Let’s Talk
Edit the courses for duration price and more in bulk
If you wish to set a category for courses, set the date of creation, difficult and other categories. The edit and advanced search filters of Smart Manager let you set the category within seconds. Once the results are in front of you, press on the bulk edit option, set the required parameters and press on update.
Search for courses based on tracks, tags and categories
The smart mana manager of the tool lets you filter any course based on various conditions. Although, in complex situations, the smart manager immediately delivers the results. For instance, you search the courses related to coding and marketing categories. Also, you can search all courses having 3+ months durations, courses whose price is more than $100 and less than $500, courses having simple tags etc.
Search for customers/students based on courses and take the required steps
With the help of a smart manager, you can find the customers/ students who have enrolled for membership or a particular course. After that, you can decide what steps to take for the students. For example, you can take the following actions-
⦁ Enroll top achievers in another course for free
⦁ Assign discounts and coupons to redeem on the next course
⦁ Set drip content for a few users among the selected ones.
⦁ Award them with a certificate
What’s your Biggest LifterLMS Challenge Right Now?
Let’s TalkDelete Courses
You may have planned some test assignments, quizzes, and more before beginning it live with the main ones. Hence, with Smart Manager, you can easily search and delete these courses or move them to the trash. You can also view all the trash courses in the Smart Manager and then permanently delete them.
Manage Memberships
You can also handle the memberships from a single place like the courses. With the help of a smart manager, you can update the memberships in bulk, call off the membership status in bulk, filter memberships based on tags and categories, add/ modify coupons to the membership plans, and export all the membership filters or data for further reference.
Export Courses to CSV
You can fetch all your data to CSV by applying column, search, and date filters before exporting. You can export the course data to other places based on the categories.
Manage SEO/Keywords for Pages and Posts
A course is incomplete without SEO. If you want your course to rank in the search engines, you will have to modify your keywords, apply redirection, change URLs and much more. The Smart Manager lets you manage SEO-related tasks. For example, you use the search and edit to find any related keywords, export SEO fields etc.
Wrapping Up!
LifterLMS is the best WordPress plugin with a bunch of functionality and features that improve the course’s membership aspect. Thus, saving time and managing the courses from a single place seems difficult if you are using this plugin. But, thanks to the Smart Manager that has cracked the nut and made managing courses possible. Today, thousands of users are using the Smart Manager to complete store management work. So, what are you waiting for? Get started using the tool today and manage all your LifterLMS courses from single place easily.
by Vishavjeet | Sep 6, 2021 | blog
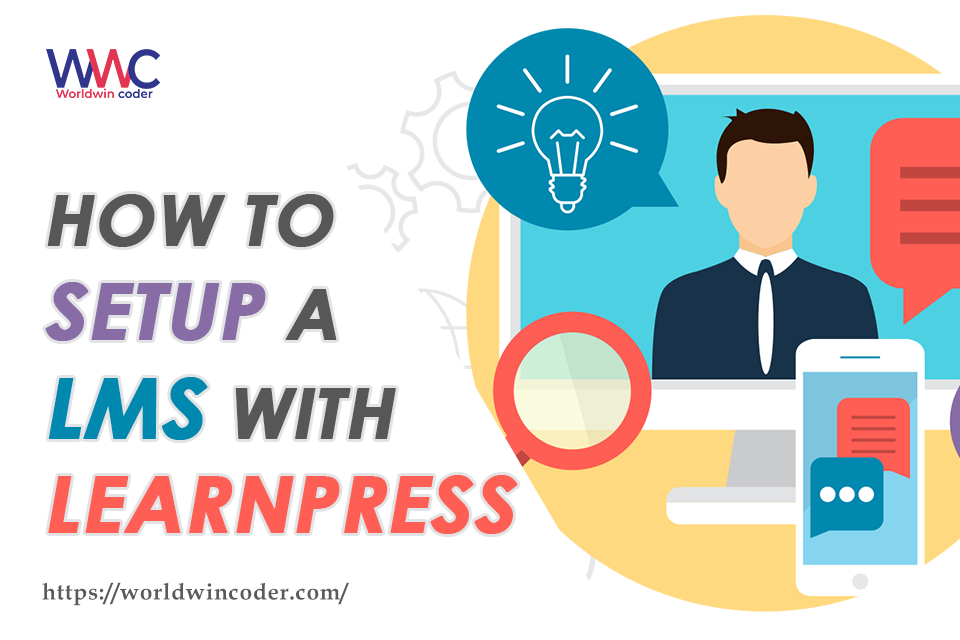
Are you looking for a learning management system? Do you use WordPress for customizing your websites?
If you want to generate more revenue and earn more income, you must integrate online courses into your websites. The benefit of having LMS on your website is that it can attract all types of readers i.e students, teachers, parents, professionals, administrators, etc.
No matter, you are a beginner or have some sort of WordPress knowledge, you can still integrate LearnPress. Using this plugin is very easy. If you follow the below steps, you can integrate the open-source tool in very less time :
Overview Of LearnPress –
LearnPress is a free WordPress plugin provided by ThimPress. Several online quizzes and lessons can be designed with the help of this plugin. It provides all the functionalities which are needed by an LMS. LearnPress is a Onestop solution for the website all other functions too.
They have their own:-
1. Advanced Registration System
2. Payment System
3. Custom Profile
4. Student tracking and Analysis and many more.
LearnPress is also compatible with many other great plugins in the market like Paid Membership Pro, WooCommerce, Gravity forms, etc.
Pre – Requirements –
Before starting the process, you need to have a working system (with a proper internet connection) having WordPress installed in it. If you don’t know how to set up WordPress, you must search from the internet. There are so many tutorials on the internet that can help you to install/configure the Content Management System (WordPress).
How To Work With LeanPress –
If WordPress is working fine in your computer system, let’s start with the installation and configuration of LearnPress.
Step – 1
Log in with your credentials and open the WordPress Content Management System. As LearnPress is a plugin that extends the overall functionality, so you will need to look for plugins. In the left sidebar, you need to click on the Plugins menu. After that, you need to click on “Add New”. After that search for “LearnPress WordPress LMS Plugin” and choose the “Activate” button.

Step – 2
Now, you will see the overall plugin installation wizard. Click on “Run Setup Wizard” and select the steps that want to integrate into WordPress. All of these steps are not mandatory to be done at that time. You can skip and start creating your first online course.
Some of the things that can be configured include:
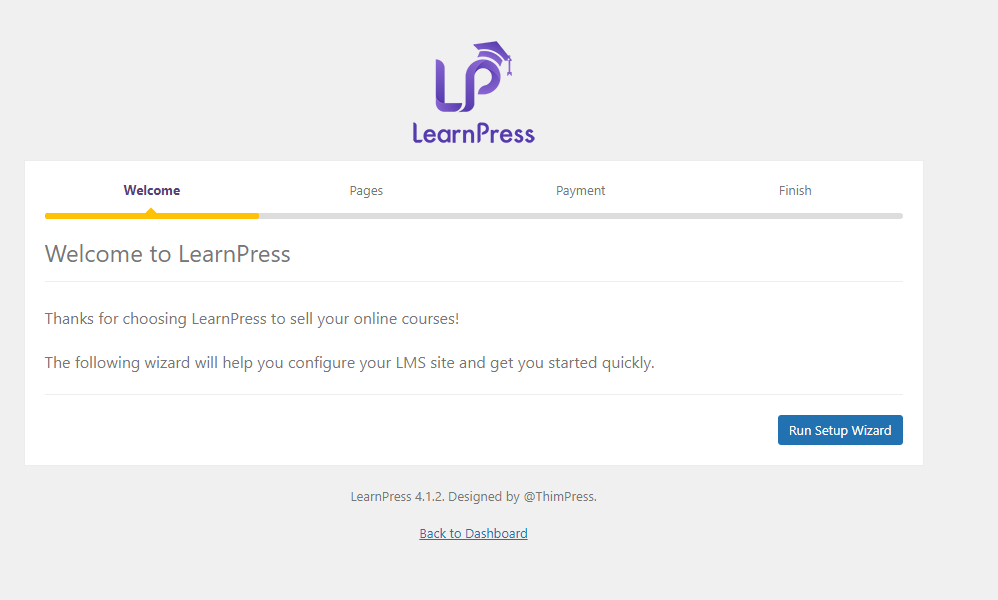
1. Creation of pages such as Courses Page, Profile Page, Checkout Page, or any other product page for the course.
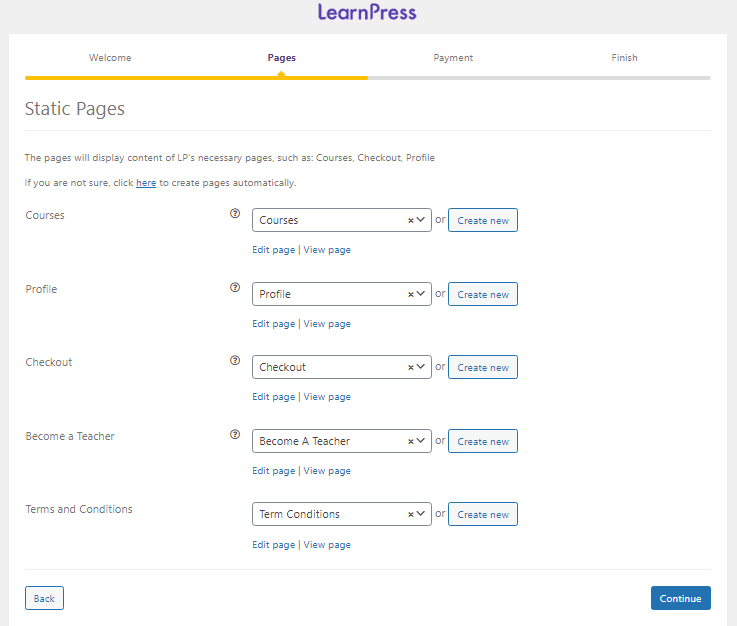
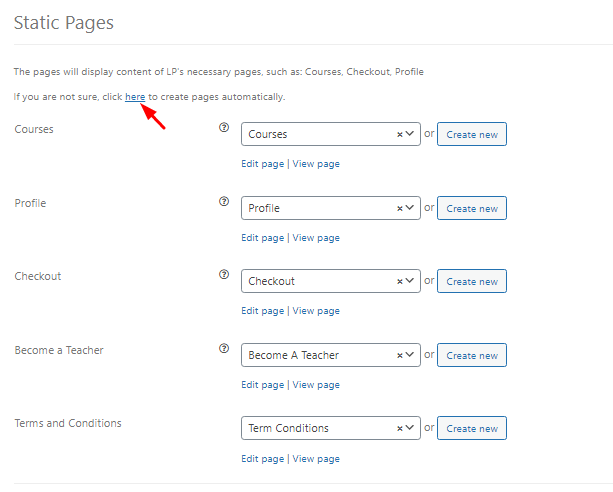
2. If pages are not created click on the “Create New” button to create pages for that particular content Or click on the link given to generate all pages at once.
3. Settings of currency i.e. in which country the courses would be available and at what prices.
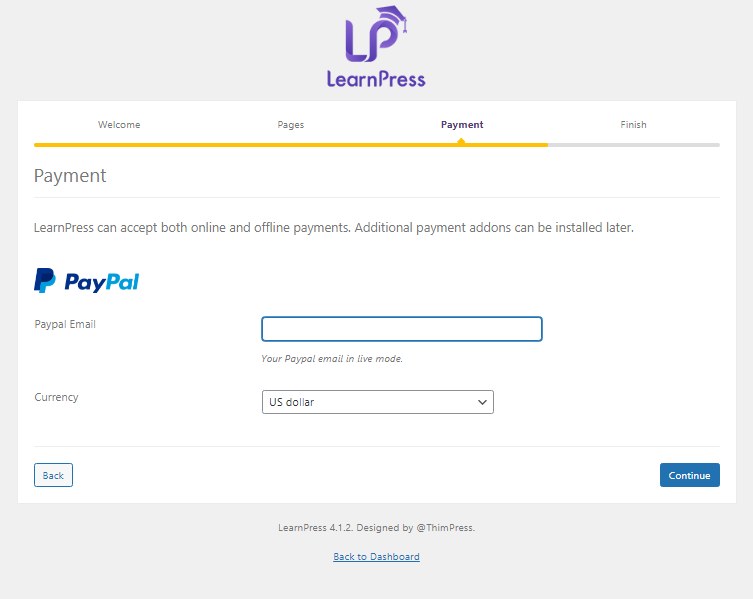
At this stage you will get several buttons, you can move ahead for the respective purpose you want. After that you will see at the backend Learnpress is installed and you can create your Courses.
Step -3
Finally, you can start creating your online course. If you have used the WordPress editor, you will notice that the LearnPress editor looks exactly the same. So, this is a wonderful thing that can help you make an online learning website like Skillshare, Coursera.
Just as if you are writing a blog, start the course by giving a title and a description. From the theme section, you can select the particular theme you want to apply in your website course. Then, there is an option for saving it as a draft, therefore, you can save some of your work done and complete it later. From the categories tab, you can select the particular category in which you are creating your online course. Technical/Non-Technical or any other thing that you want your readers to learn can be selected from LearnPress.
Like popular learning websites, LearnPress also offers a section called lessons i.e. you can divide your course into so many lessons that increase the interest of readers.
All other important sales features that can help to earn maximum revenue are also provided by this free WordPress plugin. For example – there is a preview option that can help readers to get a brief overview of the complete courses. This tip increases interest and more chances of sales. Therefore, you can select the specific tips and create an amazing online course on your website.
Wrapping Up
Thanks to LearnPress, a free WordPress Plugin, you can create one of the best online courses. The entire process from start to end is pretty much easy. Furthermore, if you are all set with your online course, your information is available online in a very little period.
According to your preference, you can apply appropriate settings, themes, select particular categories, create so many lessons, preview your work and publish. Therefore, set up an LMS with LearnPress to earn higher revenues and sales.


