by WorldWin Coder Pvt Ltd | Sep 1, 2023 | blog, WordPress
Are you an e-learning business owner looking to take your courses to the next level? Look no further than WordPress LMS. With its powerful features and user-friendly interface, WordPress LMS can help you boost your e-learning business to new heights. In this article, we will explore some tips and strategies for success with WordPress LMS.
WordPress LMS is not just a platform to host your courses; it is a robust learning management system that provides you with all the tools you need to create, manage, and sell your online courses. From customizable course layouts to built-in e-commerce capabilities, WordPress LMS offers everything you need to deliver a seamless e-learning experience to your students.
With the right strategies in place, you can attract more students, increase course completion rates, and ultimately grow your e-learning business. Whether you are just getting started or looking to optimize your existing courses, this article will provide you with valuable insights and practical tips to help you succeed with WordPress LMS. So, let’s dive in and unleash the full potential of your e-learning business.
Importance of a Learning Management System (LMS) for e-learning
In today’s digital age, e-learning has become a popular and convenient way for people to acquire new knowledge and skills. However, managing and delivering online courses can be a daunting task without the right tools and systems in place. This is where a Learning Management System (LMS) comes into play.
An LMS is a software application that allows you to create, manage, and deliver online courses. It provides you with a centralized platform where you can organize your course content, track student progress, and facilitate communication between instructors and learners. By using an LMS, you can streamline your e-learning business operations and deliver a seamless learning experience to your students.
WordPress LMS stands out as a top choice for e-learning businesses due to its flexibility, scalability, and extensive plugin ecosystem. With WordPress LMS, you can create a fully customized e-learning platform that aligns with your brand and offers a unique user experience. Let’s explore some of the benefits of using WordPress as your LMS platform.
Benefits of using WordPress as your LMS platform
1. Flexibility and Customization: WordPress is known for its flexibility and extensibility. With thousands of themes and plugins available, you can easily customize the look and functionality of your e-learning platform to suit your specific needs. Whether you want to create a sleek and modern design or a more traditional and formal layout, WordPress offers endless possibilities.
2. User-Friendly Interface: WordPress is designed with user experience in mind. Its intuitive interface makes it easy for instructors to create and manage courses, and for students to navigate through the platform. You don’t need to have any coding or technical skills to get started with WordPress LMS, making it accessible to e-learning businesses of all sizes.
3. E-Commerce Capabilities: Selling your online courses is a crucial aspect of running a successful e-learning business. WordPress LMS comes with built-in e-commerce capabilities, allowing you to easily monetize your courses. You can set up payment gateways, offer different pricing options, and even create membership plans to attract recurring revenue.
Now that we understand the benefits of using WordPress as your LMS platform, let’s dive into the process of choosing the right WordPress LMS plugin for your e-learning business.
Choosing the right WordPress LMS plugin for your e-learning business
When it comes to WordPress LMS plugins, there are several options available in the market. Each plugin offers its own set of features and functionalities, so it’s important to choose one that aligns with your specific requirements. Here are a few factors to consider when selecting a WordPress LMS plugin:
1. Course Management Features: Look for a plugin that offers comprehensive course management features such as the ability to create lessons, quizzes, assignments, and track student progress. The plugin should also support different types of content, including text, video, audio, and interactive elements.
2. Integration with Payment Gateways: If you plan on selling your courses, make sure the plugin integrates with popular payment gateways like PayPal, Stripe, or WooCommerce. This will ensure a seamless and secure payment process for your students.
3. User Management and Communication: A good WordPress LMS plugin should have robust user management features, allowing you to create user profiles, manage enrollments, and facilitate communication between instructors and students. Look for features like discussion forums, messaging systems, and email notifications.
Once you have identified the right WordPress LMS plugin for your e-learning business, the next step is to set up your e-learning website on WordPress. Let’s explore some tips for designing a user-friendly and visually appealing e-learning platform.
Setting up your e-learning website on WordPress
Designing a user-friendly and visually appealing e-learning platform is essential to engage your students and enhance their learning experience. Here are some tips to consider when setting up your e-learning website on WordPress:
1. Choose a Responsive Theme: Select a WordPress theme that is responsive and mobile-friendly. This will ensure that your e-learning platform looks great on all devices, including smartphones and tablets.
2. Organize Your Content: Structure your course content in a logical and organized manner. Use categories, tags, and menus to make it easy for students to navigate through your courses and find the information they need.
3. Use Visual Elements: Incorporate visual elements like images, videos, and infographics to enhance the learning experience. Visuals can help explain complex concepts, break up text-heavy content, and make your courses more engaging.
4. Optimize Load Times: Slow-loading websites can lead to a poor user experience and high bounce rates. Optimize your e-learning website’s load times by compressing images, using caching plugins, and choosing a reliable hosting provider.
By following these tips, you can create a visually appealing and user-friendly e-learning platform that will keep your students coming back for more. Now, let’s move on to the next step: creating and organizing your e-learning content.
Designing a user-friendly and visually appealing e-learning platform
The success of your e-learning business heavily relies on the quality and organization of your course content. Here are some best practices to consider when creating and organizing your e-learning content on WordPress:
1. Create Engaging and Interactive Lessons: Break down your course content into bite-sized lessons that are easy to digest. Use a variety of teaching methods, such as videos, quizzes, and interactive elements, to keep your students engaged and facilitate active learning.
2. Create Clear Learning Objectives: Clearly define the learning objectives for each lesson or module. This will help your students understand what they will be able to achieve after completing the course and keep them motivated throughout their learning journey.
3. Organize Content into Modules: Group related lessons into modules or sections. This will make it easier for students to navigate through the course and understand the structure of the content.
4. Offer Supplementary Resources: Provide additional resources such as PDFs, eBooks, or external links to further enrich your students’ learning experience. These resources can serve as reference materials or provide additional context to the course content.
By following these best practices, you can create well-structured and engaging e-learning content that will keep your students motivated and ensure a high course completion rate. Now, let’s move on to the next step: implementing interactive features and assessments in your e-learning courses.
Creating and organizing your e-learning content
Interactive features and assessments play a vital role in enhancing the learning experience and evaluating your students’ progress. Here are some features and assessment options you can implement in your e-learning courses on WordPress:
1. Quizzes and Assessments: Create quizzes and assessments to test your students’ knowledge and understanding of the course material. WordPress LMS plugins typically offer built-in quiz functionality, allowing you to create multiple-choice, true/false, or open-ended questions.
2. Discussion Forums: Implement discussion forums where students can ask questions, share insights, and collaborate with fellow learners. Discussion forums can foster a sense of community and provide a platform for students to engage with the course content.
3. Gamification: Gamify your courses by incorporating badges, points, or leaderboards. This can create a competitive and engaging learning environment, motivating students to complete their courses and earn achievements.
4. Interactive Multimedia: Utilize interactive multimedia elements like audio, video, and simulations to make your courses more engaging and interactive. These elements can help reinforce key concepts and provide real-world examples.
By implementing these interactive features and assessments, you can create a dynamic and engaging learning experience for your students, ultimately leading to higher course completion rates and student satisfaction. Now, let’s move on to the next step: marketing and promoting your e-learning business using WordPress.
Implementing interactive features and assessments in your e-learning courses
Once your e-learning platform is up and running, it’s time to focus on marketing and promoting your courses to attract more students. Here are some effective strategies to market your e-learning business using WordPress:
1. Content Marketing: Create valuable and informative content related to your course topics and publish it on your WordPress blog. This will not only establish you as an industry expert but also drive organic traffic to your website and increase brand visibility.
2. Email Marketing: Build an email list and send regular newsletters to your subscribers. Offer exclusive discounts, updates on new courses, and valuable resources to keep your audience engaged and encourage them to enroll in your courses.
3. Social Media Marketing: Leverage the power of social media platforms like Facebook, LinkedIn, and Twitter to promote your courses. Share engaging content, run targeted ads, and engage with your audience to build a strong online presence.
4. Affiliate Marketing: Partner with influencers or industry experts who can promote your courses to their audience. Offer them a commission for every student they refer to your platform, incentivizing them to promote your courses.
By implementing these marketing strategies, you can reach a wider audience, increase brand awareness, and attract more students to your e-learning business. Now, let’s move on to the final step: best practices for managing and scaling your e-learning business on WordPress.
Marketing and promoting your e-learning business using WordPress
As your e-learning business grows, it’s important to have systems and processes in place to manage and scale your operations effectively. Here are some best practices to consider:
1. Automate Administrative Tasks: Use automation tools and plugins to streamline administrative tasks such as course enrollment, student management, and certificate generation. This will save you time and allow you to focus on creating high-quality content and growing your business.
2. Collect and Analyze Data: Utilize analytics tools to track student progress, course completion rates, and engagement metrics. This data will provide valuable insights into the effectiveness of your courses and help you make data-driven decisions to improve your offerings.
3. Continuously Update and Improve: Stay relevant and competitive by regularly updating and improving your courses. Incorporate student feedback, industry trends, and emerging technologies to ensure your courses remain up-to-date and valuable.
4. Offer Continuing Education: Consider offering continuing education or certification programs to attract professionals who are looking to upskill or maintain their credentials. Continuing education programs can provide a recurring revenue stream and attract a dedicated audience.
By following these best practices, you can effectively manage and scale your e-learning business on WordPress, ensuring long-term success and growth.
In conclusion, WordPress LMS offers a powerful platform for e-learning businesses to deliver a seamless and engaging learning experience to their students. By choosing the right WordPress LMS plugin, setting up a user-friendly website, creating and organizing high-quality content, implementing interactive features, marketing your courses effectively, and managing your business efficiently, you can boost your e-learning business to new heights. So, embrace the potential of WordPress LMS and take your e-learning business to the next level!
Best practices for managing and scaling your e-learning business on WordPress
When it comes to marketing and promoting your e-learning business, WordPress LMS offers a wide range of tools and features to help you reach your target audience and attract more students. Let’s take a look at some best practices to effectively market your courses.
### 1. Create Compelling Course Landing Pages
One of the first steps in marketing your e-learning courses is to create compelling landing pages that showcase the value and benefits of your courses. With WordPress LMS, you can easily customize your course landing pages to reflect your brand and attract potential students. Use persuasive copy and high-quality visuals to grab the attention of your visitors and convince them to enroll in your courses.
### 2. Optimize Your Course Content for Search Engines
To attract organic traffic and improve your visibility in search engine results, it’s important to optimize your course content for relevant keywords. Conduct keyword research to identify the terms and phrases your target audience is searching for, and incorporate them into your course titles, descriptions, and content. This will help search engines understand the relevance of your courses and improve your chances of appearing higher in search results.
### 3. Leverage Social Media Channels
Social media platforms are a powerful tool for promoting your e-learning business. Create dedicated social media profiles for your business and regularly share updates, course previews, testimonials, and engaging content to attract and engage your audience. Take advantage of paid advertising options on platforms like Facebook, Instagram, and LinkedIn to reach a wider audience and increase your course enrollments.
by WorldWin Coder Pvt Ltd | Aug 30, 2023 | blog, WordPress
As the world of education continues to embrace the digital realm, Learning Management Systems (LMS) have become a cornerstone of modern learning experiences. Integrating LMS functionality into WordPress websites has become increasingly popular, and to complement this functionality, LMS WordPress themes offer a tailored design to enhance the visual and interactive aspects of online courses. In this guide, we’ll explore the realm of LMS WordPress themes, their significance, features, and some noteworthy options to consider.
The Fusion of Learning and Design
LMS WordPress themes bridge the gap between effective teaching and captivating design. Beyond the functional aspects of delivering content and assessments, these themes transform the learning experience by creating an immersive and engaging environment. Whether you’re an educational institution, a corporate training center, or an individual educator, selecting the right LMS WordPress theme can significantly impact the success of your online courses.
Key Benefits of LMS WordPress Themes
- Visual Appeal: LMS WordPress themes offer aesthetically pleasing designs that resonate with learners. These themes are crafted to enhance user engagement through thoughtful layouts, typography, and multimedia integration.
- Customization: Personalization is crucial for branding and creating a unique online presence. Themes often provide customization options, allowing you to adapt colors, fonts, and layouts to align with your identity.
- User Experience: Smooth navigation, intuitive interfaces, and responsive designs contribute to a positive user experience. LMS themes optimize the learning journey for students of all technical levels.
- Interactivity: Many themes come with built-in interactive elements like discussion forums, quizzes, and assignments. These elements foster engagement and active participation.
- Compatibility: LMS WordPress themes are designed to seamlessly integrate with LMS plugins, ensuring that the educational functionality remains intact while enhancing the visual aspect.
Exploring Top LMS WordPress Themes
- Eduma: Eduma is a versatile LMS WordPress theme that offers a variety of layouts, course styles, and customizable features. It integrates seamlessly with popular LMS plugins and is suitable for a range of educational purposes.
- Astra: Astra is a lightweight and highly customizable theme that works well with LMS plugins. Its flexibility and speed make it an excellent choice for educators who prioritize performance.
- Eikra: Eikra is tailored for educational institutions, offering a professional design, event management, and course enrollment features. It’s compatible with popular LMS plugins and supports e-commerce functionalities.
- Academy Pro: Built on the Genesis framework, Academy Pro provides a clean and elegant design for online education websites. It offers various customizable elements and integrates with the LearnDash plugin seamlessly.
- WPLMS: WPLMS is a dedicated LMS theme that offers extensive features for course creation, management, and engagement. It’s suitable for creating large-scale online learning platforms.
Factors for Consideration
- Responsive Design: In an age of mobile learning, ensure the theme is responsive across devices to provide a consistent experience.
- Integration with LMS Plugins: Verify compatibility with your chosen LMS plugin to ensure smooth functionality.
- Page Builder Compatibility: Many themes support popular page builders like Elementor or WPBakery, allowing you to customize layouts without coding.
- Demo Content: Themes with demo content can simplify the initial setup process and provide a starting point for your design.
- Support and Updates: Choose themes with active customer support and regular updates to ensure compatibility with the latest WordPress versions.
Conclusion
LMS WordPress themes represent the fusion of pedagogy and design, enhancing the educational journey for learners worldwide. Whether you’re an educator or an institution, selecting the right theme can make your online courses visually appealing, interactive, and engaging. As you embark on your journey to create an online learning platform, consider the unique features of different LMS WordPress themes, align them with your goals, and make a choice that amplifies the impact of your educational efforts. With the right theme, you’ll not only deliver knowledge but also provide an unforgettable learning experience.
by WorldWin Coder Pvt Ltd | Aug 28, 2023 | blog, WordPress
In the world of WordPress, where content management meets creativity, taxonomy plays a pivotal role in organizing and classifying information. Whether you’re a seasoned WordPress developer or a beginner looking to enhance your understanding, this comprehensive guide will delve into the intricacies of taxonomy in WordPress. From its fundamental concepts to practical implementation and best practices, we’ll cover everything you need to know about taxonomy and how it empowers you to create a more organized and user-friendly website.
Understanding Taxonomy in WordPress
Defining Taxonomy
Taxonomy, in the context of WordPress, refers to the categorization and organization of content. It’s a way to group similar content together, making it easier for users to navigate and locate specific information. WordPress incorporates taxonomy as a method to classify content into different categories, tags, or custom hierarchies.
Taxonomy Components
In WordPress, taxonomy is comprised of several key components:
- Terms: Terms are individual items within a taxonomy. For instance, in a “Category” taxonomy, terms could be “Technology,” “Travel,” and “Food.”
- Taxonomy: Taxonomy is the grouping mechanism used to organize terms. WordPress comes with built-in taxonomies like “Categories” and “Tags,” and you can also create custom taxonomies to suit your content’s unique needs.
- Hierarchy: Taxonomies can be hierarchical or non-hierarchical. Hierarchical taxonomies have parent-child relationships (like categories), while non-hierarchical taxonomies (like tags) are flat and don’t have a hierarchical structure.
Built-in Taxonomies in WordPress
Categories
Categories are one of the two default taxonomies in WordPress. They’re used to broadly classify content into different sections or topics. For instance, a blog might use categories like “Technology,” “Health,” and “Lifestyle.”
Tags
Tags, the other default taxonomy, provide a more granular way to label content. They’re like keywords that describe the content in more detail. For a cooking blog, tags could include “Recipes,” “Baking,” and “Vegetarian.”
Creating Custom Taxonomies
When to Use Custom Taxonomies
Custom taxonomies come into play when the built-in taxonomies don’t suit your content’s organization needs. If your website focuses on books, you might want to create a custom taxonomy called “Genres” to categorize books by their literary genres.
Steps to Create Custom Taxonomies
- Registering the Taxonomy: This involves using WordPress functions to define the new taxonomy, its labels, behavior, and more.
- Assigning to Post Types: You can associate your custom taxonomy with specific post types (like posts or custom post types) so that it only applies to relevant content.
- Displaying Taxonomy Terms: When creating or editing content, you can assign terms from your custom taxonomy to the content, allowing users to categorize their posts.
Utilizing Taxonomy for Better Content Organization
Improving User Experience
Taxonomy greatly improves user experience by helping visitors find the content they’re interested in quickly. By organizing content into logical categories and tags, you make navigation intuitive.
Enhancing SEO
Search engines appreciate well-organized content. Taxonomy enhances SEO by creating a clear structure that search engine bots can understand. When users search for specific topics related to your content, a well-implemented taxonomy can increase your site’s visibility in search results.
Best Practices for Working with Taxonomy in WordPress
- Plan Ahead: Before creating custom taxonomies, plan your content structure. Consider the types of content you’ll have and how users might search for it.
- Avoid Overcomplicating: While custom taxonomies offer flexibility, don’t overcomplicate your site’s structure. Keep it simple and user-friendly.
- Consistent Naming: Ensure that your taxonomy names and terms are clear, concise, and consistent. This aids both users and search engines.
- Use Hierarchies Wisely: If using hierarchical taxonomies, make sure the hierarchy makes sense and adds value. Don’t create unnecessary layers.
Advanced Techniques and Plugins
Advanced Querying
WordPress offers powerful query capabilities that allow you to retrieve content based on specific taxonomy terms. This is useful for creating custom templates or displaying content in unique ways.
Plugins for Taxonomy Management
Several plugins simplify taxonomy management. “Advanced Custom Fields” lets you create custom taxonomies effortlessly, while “Custom Post Type UI” assists in creating both custom post types and taxonomies.
Conclusion
Taxonomy is a foundational element that empowers WordPress websites to efficiently categorize and organize content. With an understanding of the core concepts, you can create an organized, user-friendly website that is both visually appealing and highly functional. Whether you’re utilizing built-in taxonomies or crafting custom ones, taxonomy in WordPress is an indispensable tool for enhancing user experience, improving SEO, and effectively managing content.

by WorldWin Coder Pvt Ltd | Aug 25, 2023 | blog, WordPress
In today’s fast-paced world, staying ahead of the learning curve is essential for personal and professional growth. As the digital landscape continues to evolve, traditional methods of education are transforming into more dynamic and accessible formats. This is where Learning Management Systems (LMS) come into play, revolutionizing the way we learn and teach. In this comprehensive guide, we will explore how integrating an LMS into WordPress can supercharge your online learning or training initiatives.
Chapter 1: Understanding Learning Management Systems (LMS)
Before diving into the specifics of WordPress integration, it’s crucial to grasp the fundamentals of Learning Management Systems. An LMS is a software application designed to facilitate the creation, delivery, and management of educational content. It offers a centralized platform for instructors to deliver courses, manage assignments, track progress, and interact with learners. LMS systems streamline the learning process, making education more engaging and efficient.
Chapter 2: The Benefits of Using an LMS
2.1 Scalability and Accessibility
LMS platforms, when integrated with WordPress, enable seamless scalability. Whether you’re an educational institution, a corporate entity, or an individual instructor, you can effortlessly manage a growing number of learners without compromising the quality of education. Moreover, an LMS enhances accessibility by allowing learners to access courses anytime, anywhere, breaking down geographical barriers.
2.2 Engaging Learning Experience
Modern learners seek interactive and engaging learning experiences. LMS systems offer multimedia support, interactive quizzes, discussion forums, and more. WordPress integration empowers educators to create visually appealing and interactive content that caters to diverse learning styles, keeping learners motivated and committed.
2.3 Comprehensive Tracking and Reporting
Assessing learner progress is vital for refining teaching strategies. LMS systems provide in-depth insights into learner performance. With WordPress integration, you can effortlessly track completion rates, quiz scores, and participation levels. These analytics help instructors identify areas for improvement and adapt their courses accordingly.
2.4 Cost and Time Efficiency
Traditional learning methods can be time and resource-intensive. LMS systems automate various administrative tasks such as enrollment, grading, and certification. Integrating an LMS with WordPress streamlines the entire process, allowing educators to focus on creating quality content rather than getting bogged down by logistics.
Chapter 3: WordPress as an LMS Platform
3.1 Choosing the Right LMS Plugin
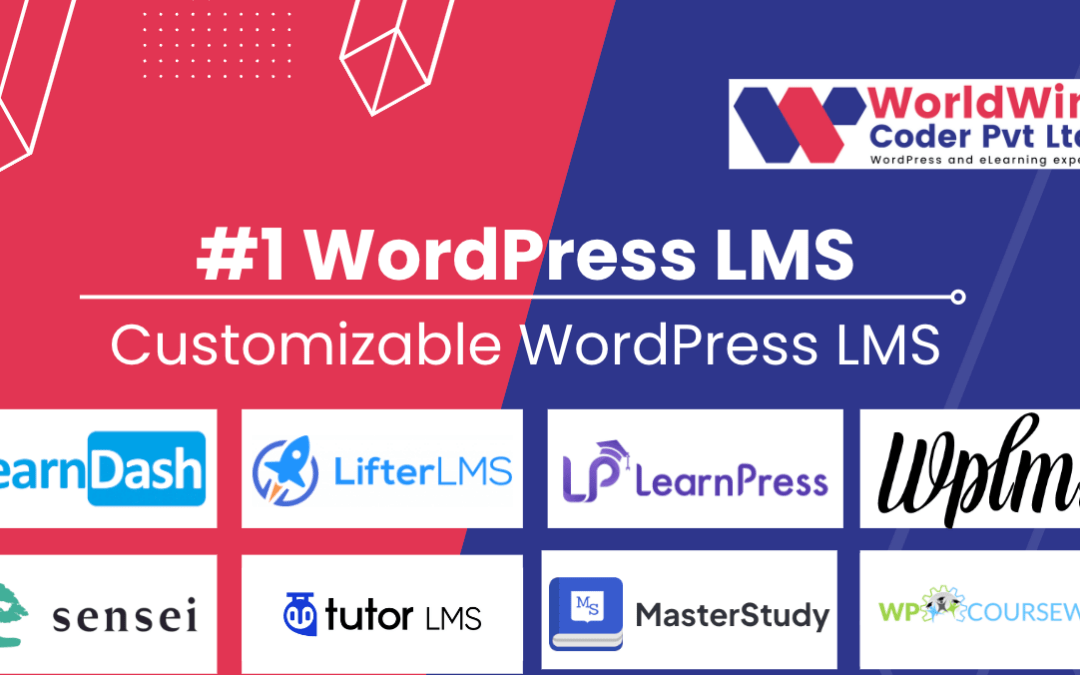
WordPress offers a plethora of LMS plugins, each with its own set of features. Popular choices include LearnDash, LifterLMS, and Sensei. When selecting a plugin, consider factors like course structure, payment gateways, content drip, and integration capabilities.
3.2 Content Creation and Management
With WordPress’s user-friendly interface and visual editors, creating and managing course content becomes a breeze. Whether it’s text, images, videos, or quizzes, WordPress simplifies the process, making it accessible to educators without extensive technical skills.
3.3 Customization and Branding
Maintaining your brand identity within the learning environment is essential. WordPress’s extensive theme and customization options ensure that your LMS platform aligns with your branding, providing a cohesive user experience.
3.4 Monetization Options
If you’re offering premium courses, WordPress LMS plugins come with built-in monetization features. You can set up one-time payments, subscription models, or even offer free courses to attract learners and upsell premium content.
Chapter 4: Best Practices for a Successful LMS Integration
4.1 User-Friendly Navigation
Ensure that your LMS platform is intuitive to navigate. A clutter-free interface, easy-to-find courses, and clear instructions contribute to a positive user experience.
4.2 Mobile Responsiveness
In an increasingly mobile world, optimizing your LMS for mobile devices is imperative. WordPress’s responsive design capabilities automatically adapt your content to different screen sizes.
4.3 Regular Updates and Maintenance
Both WordPress and LMS plugins require regular updates for security and functionality enhancements. Stay proactive in keeping your platform up to date to provide a seamless learning experience.
4.4 Interactive Support
Offer prompt user support to address any technical issues or queries. A responsive support system fosters a sense of community and trust among learners.
Conclusion
Integrating a Learning Management System into WordPress opens up a world of possibilities for educators and learners alike. The combination of WordPress’s flexibility and the capabilities of an LMS empowers you to create, deliver, and manage courses effectively. Whether you’re a seasoned educator or a business looking to train employees, harnessing the power of an LMS in WordPress could be the key to unlocking a more efficient and engaging learning journey

by WorldWin Coder Pvt Ltd | Aug 21, 2023 | blog, WordPress
In today’s digital age, where online transactions are the norm, having a reliable and secure payment gateway for your website is not just a luxury but a necessity. Whether you’re running an e-commerce store, a subscription-based service, or even a non-profit organization, integrating a robust payment gateway can make or break your online business. In this comprehensive guide, we will delve deep into the world of payment gateways for websites, discussing their significance, functionality, types, benefits, and how to choose the right one for your specific needs.
Understanding Payment Gateways
A payment gateway is essentially a technology that enables online businesses to accept electronic payments from customers. It acts as a bridge between the customer and the merchant’s website, securely facilitating the transaction process. Payment gateways encrypt sensitive information such as credit card numbers, ensuring that the data remains confidential and safe from potential cyber threats.
Importance of Payment Gateways
- Enhanced Customer Trust: In the digital realm, customers are cautious about sharing their financial information. A trusted payment gateway can assure them of a secure transaction, building trust and encouraging repeat business.
- Global Reach: Payment gateways allow businesses to operate on a global scale, accepting payments in different currencies and catering to international customers.
- Efficiency and Convenience: Integrating a payment gateway streamlines the payment process, reducing the hassle of manual payment handling and reconciliation.
- Reduced Cart Abandonment: A seamless checkout experience through a user-friendly payment gateway can significantly reduce cart abandonment rates, leading to higher conversion rates.
Functionality of Payment Gateways
- Encryption and Security: Payment gateways use encryption protocols to safeguard sensitive data during transmission. Secure Sockets Layer (SSL) certificates ensure that the data remains encrypted and protected from potential threats.
- Authorization and Capture: Payment gateways authenticate and authorize transactions in real-time. They also facilitate the process of capturing funds from the customer’s account once the transaction is approved.
- Payment Processing: Payment gateways support various payment methods, including credit/debit cards, digital wallets, and even cryptocurrencies, providing customers with multiple options.
- Integration with Websites: Modern payment gateways can be seamlessly integrated into websites and mobile apps, providing a consistent and branded user experience.
Types of Payment Gateways
- Hosted Payment Gateways: These gateways redirect customers to a secure payment page hosted by the gateway provider. While they offer simplicity, they might redirect customers away from the website’s domain.
- Integrated Payment Gateways: Integrated gateways are embedded within the website’s interface, allowing customers to complete transactions without leaving the website. This offers a more seamless experience but requires stricter security measures.
- Self-Hosted Payment Gateways: These gateways provide complete control over the payment process, but they demand a higher level of technical expertise for setup and maintenance.
Choosing the Right Payment Gateway
- Security: Prioritize security features like SSL encryption, PCI DSS compliance, and fraud prevention mechanisms to safeguard customer data.
- Compatibility: Ensure that the chosen gateway is compatible with your website’s platform and any third-party tools you’re using.
- Payment Methods: Select a gateway that supports a wide range of payment methods to cater to diverse customer preferences.
- User Experience: Opt for a gateway with a smooth and intuitive user interface to enhance the overall customer experience.
- Fees and Costs: Consider transaction fees, setup costs, and ongoing maintenance expenses when evaluating payment gateway options.
Conclusion
In the dynamic world of online business, a payment gateway serves as the linchpin that connects customers to merchants in a secure and efficient manner. Its significance goes beyond just processing transactions; it’s about building trust, expanding reach, and providing a seamless experience to customers across the globe. As you embark on your journey of selecting the perfect payment gateway for your website, remember to prioritize security, compatibility, and user experience to set your business on the path to success in the digital marketplace.
by WorldWin Coder Pvt Ltd | Aug 18, 2023 | blog, WordPress
The world of education is in a constant state of evolution, and at the forefront of this evolution is technology. Learning Management Systems (LMS) have emerged as a cornerstone of modern education, and one such standout in this realm is the Gravity LMS Portal. In this in-depth exploration, we will uncover the intricacies of Gravity LMS Portal, its multifaceted features, the advantages it offers to educators and learners, real-world use cases, and its role in shaping the future of education.
Understanding Gravity LMS Portal
Gravity LMS Portal is a sophisticated and user-centric Learning Management System that aims to streamline the educational journey for institutions, educators, and students. Designed with an emphasis on facilitating engagement, accessibility, and efficiency, this platform provides an extensive array of tools and capabilities that cater to the diverse needs of the education ecosystem.
Key Features of Gravity LMS Portal
- Seamless Course Creation and Management Gravity LMS Portal empowers educators to effortlessly design, customize, and manage courses. Its intuitive interface enables instructors to arrange course materials, assignments, quizzes, and multimedia content with ease, thanks to its drag-and-drop functionality.
- Collaborative Learning Environments Central to the Gravity LMS Portal’s mission is fostering collaboration. The platform integrates a variety of communication tools such as discussion forums, real-time chat, and group projects, ensuring that students can connect, interact, and collaborate regardless of their geographical locations.
- Tailored Learning Pathways Recognizing the individuality of each learner, Gravity LMS Portal’s employs intelligent algorithms to analyze student performance and preferences. This data-driven approach empowers educators to craft personalized learning pathways that capitalize on strengths and target areas for improvement.
- Comprehensive Assessment Tools Gravity LMS Portal’s simplifies the assessment process with a wide range of evaluation tools. Instructors can create diverse types of assessments, including quizzes, exams, and peer reviews, providing a holistic view of student progress.
- Robust Analytical Insights Informed decision-making takes center stage with Gravity LMS Portal’s robust analytics dashboard. Instructors and administrators gain invaluable insights into learner engagement, performance trends, and course effectiveness, thereby refining teaching strategies for optimal outcomes.
Benefits of Gravity LMS Portal
- Elevated Engagement and Interactivity The interactive nature of Gravity LMS Portal’s cultivates higher levels of student engagement. Through multimedia content, gamification elements, and collaborative activities, learning becomes more enjoyable and effective.
- Flexibility and Accessibility Gravity LMS Portal’s transcends geographical limitations, granting learners the flexibility to access course materials and participate in discussions at their convenience. This accessibility accommodates diverse learning styles and schedules.
- Time and Resource Efficiency Automated administrative tasks, such as grading and attendance tracking, liberate instructors’ valuable time, allowing them to concentrate on delivering high-quality instruction.
- Informed Decision-Making Gravity LMS Portal’s robust analytics empower educators to make informed decisions regarding curriculum design and teaching methodologies, leading to continual enhancement.
Use Cases of Gravity LMS Portal
- Higher Education Institutions Gravity LMS Portal’s serves as an all-encompassing platform for universities and colleges to deliver courses, manage academic resources, and facilitate communication between faculty and students.
- Corporate Training and Development Businesses can harness the capabilities of Gravity LMS Portal to train employees, monitor progress, and ensure consistent skill development throughout the organization.
- K-12 Education Transformation From virtual classrooms to blended learning environments, Gravity LMS Portal’s adapts to the distinctive requirements of K-12 education, enabling teachers to effectively engage young learners.
- Professional Advancement Gravity LMS Portal is a valuable tool for continuous education, enabling professionals to enhance their skills, attain certifications, and remain updated within their respective fields.
Conclusion
In the digital era, education is undergoing a profound metamorphosis, and Gravity LMS Portal’s stands as a testament to the potential of technology in enriching learning experiences. With its user-friendly features, collaborative tools, and personalized learning pathways, It is revolutionizing education by promoting engagement, accessibility, and efficiency. As educational institutions and organizations around the globe embrace this groundbreaking platform, the future of learning is poised to be more dynamic, interactive, and interconnected than ever before. Gravity LMS Portal is not just an innovation; it’s a transformative force that is shaping the landscape of education for generations to come.